Tuesday 31 March 2015
New article (They"re only zombies) has been published on My Emergency Preparedness Blog
zombie armor and a personal perspective on the zombie question.
They"re only zombies
http://bit.ly/1BNCvdL
#preppernews
Look at my new blogpost - Drive By Footage of HAZMAT Spill. E. Caanan CT
09/22/14. HAZMAT spill on Route 44 in East Caanan CT. Multiplie town and agency response.Fire Depts: East Caanan, Norfolk, Winchester, Colbrook, Pine Meadow, Torrington (and some others)….
Drive By Footage of HAZMAT Spill. E. Caanan CT
http://bit.ly/1CKZPNo
#shtf
Look at my new blogpost - Shout out too Stillkeepin1 and Massachusetts Prepper
Two great you tubers go check out there channels I will even pay you in cake ! https://www.youtube.com/user/stillkeepin1/feed https://www.youtube.com/channel/UCS7iycPx3oIxD9KAfzglAzg.
Shout out too Stillkeepin1 and Massachusetts Prepper
http://bit.ly/1CKZv0V
#shtf
New article (TODAY SHOW ~ *FEMA MONEY PROBLEMS* ~ www.GreatEasyFood.com ~ (760-625-1509)) has been published on My Emergency Preparedness Blog
Got o – http://www.greateasyfood.com/ – TODAY SHOW ~ *FEMA MONEY PROBLEMS* ~ http://www.greateasyfood.com ~ (760-625-1509) Efoods Global ~ *Don’t Wait Anymor…
TODAY SHOW ~ *FEMA MONEY PROBLEMS* ~ www.GreatEasyFood.com ~ (760-625-1509)
http://bit.ly/19AloEN
#shtf
Look at my new blogpost - *NEW!* Thrunite TN4A Review: 4xAA 1150 lumen Compact Thrower!
Find the Thrunite TN4A at: Amazon.co.uk: http://www.amazon.co.uk/ThruNite%C2%AE-Intelligent-Temperature-Control-LED-Flashlight/dp/B00QFF9CLC Amazon: …
*NEW!* Thrunite TN4A Review: 4xAA 1150 lumen Compact Thrower!
http://bit.ly/19AlbkY
#preppers
I just blogged at My Emergency Preparedness Blog - The Long Good-bye, by Captnswife
Well, it has begun. Today, I closed my Paypal account. This is just the first step in the slow and admittedly painful process of disconnecting from the Internet. I’ve known it was coming for awhile, but I can’t say that made it easier. Honestly, I love this thing. The greatest joy in my life was the moment, at age six, I realized that because I could read I would never have to stop learning. The invention of the information super highway was beyond my wildest dreams. It’s the largest and most diverse library in the world, and it’s open 24 hours a day, seven days a week!
However, I must go. Like any relationship, it is only healthy as long as the boundaries are clear, strong, and respectful. My technology partner has now violated them beyond repair.
All of this began the day I read about the National Strategy for Trusted Identities in Cyberspace (NSTIC), the White House drive toward universal biometric identification for every person using the World Wide Web. I was literally sick when I realized the “trusted identities” were not the government departments, public institutions, or big box retailers responsible for managing our records. No, the trusted identities are us… but only after we are “authenticatedâ€.
If you haven’t heard of NSTIC (nastique!), you are not alone. Most Americans have no idea there is a public-private partnership between government and technology companies whose mission it is to propel us into a brave new world of human-machine integration in every aspect of our lives. The plan, which is well underway and well-funded with our tax dollars, will require you to prove you are you before you can go online. This authentication is to be carried out by a third-party and can only be achieved after you submit a part of your body– a fingerprint, iris, palm, or some other uniquely patterned part– to be stored in some great cloud server. When you wish to go online, then you will present your biometric part to the proper digital authority; if it agrees that you are who you say you are, then you will get access.
Not surprisingly, this universal or “federated” ID is being sold to consumers as a convenient alternative to passwords. Once you get on with your authenticated ID, you don’t need passwords any longer. You will be free to check your bank balance, go shopping, video chat, et cetera without having to remember all those letters and numbers and %&*!$. The Apple iPhone 6, with Apple Pay, was the first major consumer product to fully integrate the technology. Next time you see an ad for Apple Pay on television, look closely. Notice how carefully the thumb scan is edited out.
The other big sales job on biometric is that it will be more secure against fraud. The IRS, in documents discussing biometric ID programs for tax filing, justifies its use by highlighting the amount of money they lose to cheaters every year. Some politicians apparently like it, too. One state senator from New Mexico asked the secretary of state in March 2015 to force citizens to use biometric ID to vote.
Of course, the bureaucrats and geeks claim biometrics will prevent the compromising of your debit and credit cards, or any card, for that matter, including school IDs. K-12s all over the country are now using fingerprint scans in the lunch line. You won’t be surprised to learn that biometric readers are now being rolled out in airports for passenger “security”.
So, let’s stop for a moment. Do you see the pattern? The focus of online security has changed since our mutual Internet journey began nearly 20 years ago. In the past, the onus was on the site you patronized. However, universal biometric IDs shifts the responsibility to you, the individual user. If you are a responsible citizen, the thinking goes, you will gladly be authenticated to “stay safe”. Instantly, all global corporations and bureaucratic quagmires involved in online communications and money handling have been absolved of their duties to make your personal actions private and secure.
It almost goes without saying that none of them bothered to ask customers and tax payers what they thought about it, which might be because they already know nobody likes this “666” thing, except the companies in line to make billions. Wherever I mention it– whether at the bank, with my hairdresser, or at family gatherings– every single person makes a face. Not one has smiled and said, “Oh, what a good idea!†when hearing about it the first time. The most common response is the word “creepy”. Even the non-religious can see it is very much like the descriptions of the Biblical “mark of the beast” https://www.biblegateway.com/verse/en/Revelation%2013:17, including the part about buying and selling. In the very near future, you may find yourself prohibited from commerce and basic transactions– from Coke machines to banking – without having first been authenticated by your biometric mark.
So I made the decision to unplug. I know a lot of folks have been prepping for a time when the Internet and other products and services are not available, but I don’t think this was the crisis most people anticipated. We expected an external event to turn out the lights and stop the trucks. It was to be an act outside of our control that forced us to rely on stored supplies, strong bodies, and community support.
Now, we see that the day we prepped for isn’t coming from out of the blue after all. It will come by our own hands. If we choose not to submit the intimate details of our biological imprint, we might not be able to get money from the bank, or buy food at the grocery store with a credit or debit card, which must be authenticated. We might not receive healthcare or be able to sign in at work.
So I started with PayPal. The security chief there is one of the leaders of the push into a “passwordless” world. His statement forced me to realize we were beyond both “if†and “when”. I honestly thought I’d have a couple more years before I had to start pulling the plug, and I am truly sad to be making this decision. We, the people, should be the innocent ones. We have committed no crime. We have done nothing to deserve this forced reduction of our human personhood into a series of zeros and ones that fit through a digital gateway.
A couple of years ago I understood that my beloved country was not the one in which I was raised, and I spent several weeks in deep grief. I remember the 60s and 70s and 80s, and the years before 9/11 plunged us into a state of constant surveillance. It’s good that I do. A life without Internet is slow. Fortunately, I have the benefit of having lived the majority of my life before on-demand movies and instant cash and an around-the-clock digital encyclopedia.
Today, I leave PayPal, but tomorrow it will be something else, and so on, until the separation is complete. You, too, have a decision to make. Will you retain your individuality, or will you join the biometric collective?
I leave you to think and to plan. Unlearning, or discovering, a life without “login†will be a lengthy process. For those of us who choose liberty, the time has come. Â
The Long Good-bye, by Captnswife
http://bit.ly/19Ak7O2
#survivalist
I just blogged at My Emergency Preparedness Blog - Hunting Provides You With the Perfect DIY Organic Food

Preparing and eating the meat from a hunt is an homage to Mother Nature as well as a healthy choice for you and your family. Wild game yields meat that is organic, sustainable and tasty — much tastier than the meat found in grocery stores — and unlike the store-bought stuff, there have been no growth hormones, no antibiotics and no pesticides used. Here is an explanation of the process necessary for cooking and preserving your wild game to get the most out of your hunt.
Dressing
After the hunt comes the dirty work: field-dressing your kill. This is particularly important when hunting deer, for which the carcass should be dressed as soon as possible.
First, clean off any dirt, hair, feces or bloodshot visible on carcass. It will need to be cooled quickly in order to prevent the growth of bacteria, down to about 40 degrees F. Between cuts, clean your knife repeatedly to avoid transferring and spreading bacteria to the meat.
The cavity should be cleaned with paper towels then propped open to air it out. It’s not a bad idea to pack the cavity with ice after it has aired, and make sure it is not in direct sunlight. Do not tie it to a vehicle while the carcass is still warm.
If you plan to use the meat soon (within two to three days), store it in a refrigerator; otherwise, freeze it.
Cooking
Wild animal game are generally more active than the domesticated animals slaughtered for food, so the meat may be less tender and more dry. You’ll want to keep this in mind and implement techniques that encourage flavor and juiciness, like braising, where you add the meat to a pot with a little water, cover it and let it simmer.
The best spices for venison and other wild game vary from pallet to pallet, but herbs commonly used include thyme, rosemary, marjoram and sage.
Vinegar is useful in preparing fresh meat. A cloth soaked in vinegar can remove leftover hair, which can create unsavory flavor when cooked. It can also be used to cut back on the sometimes gamey taste of meat. Just dilute with water, cover the meat in the solution, and refrigerate for an hour.
Game meat should always be served really hot or very cold, as the gamey taste is most pronounced at lukewarm temperatures.
Preserving
To get the most out of your game meat, preserve what you cannot eat immediately. Use a food dehydrator to make your own pemmican or jerky; it’s a simple and tasty solution for creating a self-sustainable food source.
The main thing to keep in mind when preserving and drying your game meat is safety. Though some may complain about the amount of sodium in jerky, salt is necessary as it binds the meat’s moisture, making it so that any bacteria on the meat die out more quickly since no water is available to them to grow. The United States Department of Agriculture recommends pre-cooking the meat to 160 degrees before drying it to ensure no E. coli is present.
Choose the leanest meats in the best condition from your lot. Chunk, round and flank steak, as well as rump roast and brisket, are among the highest recommended.
After deciding upon your choice cuts, cut away and gristle and connective tissue from meat and use a sharp knife to trim off most of the fat, then the meat until firm. Slice the nearly frozen meat into long thin strips about 1/8 to 1/4-inch thick, set them out in a single layer on sanitized cutting board, then flatten them with a rolling pin. Depending on your preference, use a vinegar marinade or pickle cure for seasoning, then place in the food dehydrator. In 12-24 hours, you’ll have delicious, preserved meat that you prepared yourself.
With the right information and attitude, your next hunting expedition could yield the means to a self-sustaining food source of the highest quality and taste.
The post Hunting Provides You With the Perfect DIY Organic Food appeared first on American Preppers Network.
Hunting Provides You With the Perfect DIY Organic Food
http://bit.ly/19z4Kp3
#preppertalk
I just blogged at My Emergency Preparedness Blog - Notes for Tuesday – March 31, 2015
March 31 is the birthday of economist Dr. Walter E. Williams, PhD., who was born in 1936.
o o o
Today, we present another entry for Round 57 of the SurvivalBlog non-fiction writing contest. The $12,000+ worth of prizes for this round include:
First Prize:
- A Gunsite Academy Three Day Course Certificate, good for any one, two, or three course (a $1,195 value),
- A course certificate from onPoint Tactical. This certificate will be for the prize winner’s choice of three-day civilian courses. (Excluding those restricted for military or government teams.) Three day onPoint courses normally cost $795,
- DRD Tactical is providing a 5.56 Nato QD Billet upper with a hammer forged, chromlined barrel and a hard case to go with your own AR lower. It will allow any standard AR type rifle to have quick change barrel, which can be assembled in less then one minute without the use of any tools, and a compact carry capability in a hard case or 3-day pack (an $1,100 value),
- Gun Mag Warehouse is providing 30 DPMS AR-15 .223/5.56 30 Round Gray Mil Spec w/ Magpul Follower Magazines (a value of $448) and a Gun Mag Warehouse T-Shirt. (An equivalent prize will be awarded for residents in states with magazine restrictions.),
- Two cases of Mountain House freeze dried assorted entrees in #10 cans, courtesy of Ready Made Resources (a $350 value),
- A pre-selected assortment of military surplus gear from CJL Enterprize (a $300 value),
- A Model 120 Series Solar Generator provided by Quantum Harvest LLC (a $340 value),
- A $300 gift certificate from Freeze Dry Guy,
- A $250 gift certificate from Sunflower Ammo,
- KellyKettleUSA.com is donating both an AquaBrick water filtration kit and a Stainless Medium Scout Kelly Kettle Complete Kit with a combined retail value of $304,
- TexasgiBrass.com is providing a $300 gift certificate, and
- Two cases of meals, Ready to Eat (MREs), courtesy of CampingSurvival.com (a $180 value).
Second Prize:
- A Glock form factor SIRT laser training pistol and a SIRT AR-15/M4 Laser Training Bolt, courtesy of Next Level Training, which have a combined retail value of $589,
- A FloJak EarthStraw “Code Red” 100-foot well pump system (a $500 value), courtesy of FloJak.com,
- Acorn Supplies is donating a Deluxe Food Storage Survival Kit with a retail value of $350,
- The Ark Institute is donating a non-GMO, non-hybrid vegetable seed package–enough for two families of four, seed storage materials, a CD-ROM of Geri Guidetti’s book “Build Your Ark! How to Prepare for Self Reliance in Uncertain Times”, and two bottles of Potassium Iodate– a $325 retail value,
- A $250 gift card from Emergency Essentials,
- Twenty Five books, of the winners choice, of any books published by PrepperPress.com (a $270 value),
- TexasgiBrass.com is providing a $150 gift certificate, and
- RepackBox is providing a $300 gift certificate to their site.
Third Prize:
- A Royal Berkey water filter, courtesy of Directive 21 (a $275 value),
- A large handmade clothes drying rack, a washboard, and a Homesteading for Beginners DVD, all courtesy of The Homestead Store, with a combined value of $206,
- *Expanded sets of both washable feminine pads and liners, donated by Naturally Cozy (a $185 retail value),
- Two Super Survival Pack seed collections, a $150 value, courtesy of Seed for Security,
- Mayflower Trading is donating a $200 gift certificate for homesteading appliances,
- APEX Gun Parts is donating a $250 purchase credit,
- Montie Gear is donating a Y-Shot Slingshot and a Locking Rifle Rack (a $379 value), and
- Two 1,000-foot spools of full mil-spec U.S.-made 750 paracord (in-stock colors only) from www.TOUGHGRID.com (a $240 value).
Round 57 ends on March 31st, so get busy writing and e-mail us your entry. Remember that there is a 1,500-word minimum, and that articles on practical “how to” skills for survival have an advantage in the judging.
Notes for Tuesday – March 31, 2015
http://bit.ly/19yJaBg
#survivalist
New post (The Long Dark [#24] Signal Hill) has been published on My Emergency Preparedness Blog
Hej! Cześć! Witajcie! Oto 24 odcinek mojej serii Let’s Play (PL), czyli Zagrajmy w The Long Dark. Gra zostaÅ‚a stworzona przez studio Hinterland, a ja produkcjÄ™ przechodzÄ™ na platformie…
The Long Dark [#24] Signal Hill
http://bit.ly/1Dm35PI
#survivalist
I just blogged at My Emergency Preparedness Blog - 6 Threats to Your Food Storage Cache

Food storage is one of our favorite topics here at Survival Life.
When it comes down to it, one of the most important things you can do to make sure you and your family are prepared for a disaster or SHTF situation — no matter how big or small — is to have a food storage plan and implement it early.
Gaye Levy at Backdoor Survival is something of a food storage expert, and she has agreed to share some of her best tips with us. Read on to learn more.
The 6 Enemies of Food Storage
When it comes to stockpiling survival preps, two items are always near the top my list: food and land to grow food. Those, in my opinion, are the two most valuable commodities to have if the world and society goes to heck. As I say that, I realize that the land portion of that equation may be unattainable for many. On the other hand, almost everyone can acquire food and a place to store it.
By now you have read over and over again ad nauseam that during a disaster or a SHFT disruptive event, the grocery store shelves will be barren within a day or two. In addition, there is a strong likelihood that amenities such as electricity and refrigeration will no longer be available. That’s why having food, and an extensive knowledge of food storage techniques, is so important to long term survival.
Since the beginning of Backdoor Survival, I have explored many areas of preparedness, from basic preps, to more extensive studies of self-sufficiency and the psychological aspects of survival. Beyond all else, however, I have taken a keen interest in food and food storage.
With the rapid escalation of food prices, I want to reintroduce you to the six enemies of food storage. They are important to understand and, even if they are sometimes unavoidable, the six enemies are good to keep in mind as you invest in food for your prepper pantry.
The Six Enemies of Food Storage
Storing food for the long-term is a daunting task. For the short-term, you can usually find a spare shelf or two in your kitchen cabinets and call it a day. Beyond the short-term, things start to get more complicated. The reason is that most food products have a shelf life which is pretty much limited by some common factors, referred to as the Six Enemies of Food Storage:
Temperature
Oxygen
Moisture
Light
Pests
TimeAs you will see, each of these factors are interrelated in such a way that there is a domino effect with all of the tiles falling upon each other and ultimately affecting your stored items in a cumulative fashion. I will briefly address each one so that this becomes clear.
Temperature: Long-term food storage is best achieved by maintaining cool, constant temperatures. Ideally, temperatures between 40 degrees and 70 degrees Fahrenheit are best for long-term storage. Anything warmer or cooler results in loss of color, nutrition, texture and taste. A common rule of thumb is that for every 18 degree Fahrenheit increase in temperature (10 degrees Celsius), your food’s shelf life is cut in half.
The second factor when it comes to temperature is consistency. So if you have a location where the temperature is 40 degrees one day and 70 the next, there is going to be some loss in quality and shelf life. Let me put this another way. If you have stored your food in a garage where the temperature fluctuates between summer and winter, the shelf life will be based upon the highest temperature not the lowest.
Oxygen: Many food nutrients can oxidize in the presence of oxygen. This creates rancidity and off flavors. In addition, bacteria and microorganisms (larvae and bugs) thrive in an oxygen-rich environment. Fortunately, the use of oxygen absorbers can suck out the oxygen in your food containers, leaving only product and nitrogen (which is not harmful).
Moisture:Â Moisture comes in many forms, but the most typical are humidity and condensation. When stored food becomes moist or even slightly damp, molds and bacteria begin to grow, causing spoilage. If this food is consumed, illness will occur. In addition, moisture can cause packaging to break down, exposing the food to further degradation.
The ideal level of humidity for your stored food is 15% or less. I live in Washington State where the humidity is typically 60% or 70% or more. The way around the humidity and moisture issue is proper packaging. And with packaging, there are lots of choices including Mylar bags, food grade buckets with or without gamma seals, vacuum seal bags (such as the FoodSaver), Mason or canning jars and more.
What you decide to use to package your food will dictate how much light your food is exposed to (remember those dominoes?)
Light: The easiest way to explain how light affects your stored food is to equate light to energy. When the energy of light zaps your food, it transfers some of that energy to the food itself, degrading its nutritional value, taste and appearance. This is especially true when it comes to the fat soluble vitamins such as Vitamins A, D and E as well as proteins.
Pests: Pests are another problem. Moisture and humidity provide a breeding ground for bugs and larvae of all types. Pests come in many forms. From bugs to rodents, pests are not only a nuisance, but also a major factor to eliminate when storing food for the long-term.
It is important to be aware of the pests that are particular to your geographical climate and further, that you set a barrier between your food and the critters. In addition to a physical barrier, the use of oxygen absorbers will eliminate the oxygen (air) that most pests need to survive.
Time: Over time, food will degrade in nutritional value, appearance and taste. Time is the final enemy of food storage. And while there are many items that have an extended shelf life of 20 or 30 years, unless they are properly packaged and stored, the optimal shelf life will be considerably less.  If you really do desire products with a 30 year shelf life, I suggest you look at some of the commercially packaged alternatives at Emergency Essentials, Buy Emergency Foods, and others. These days you can even find products packaged for 20 or 30 year storage at Wal-mart and Costco.
Resources to Mitigate the Enemies of Food Storage
Once you understand the six enemies of food storage, the challenge is to learn to store food in such a way that these issues are mitigated. The easiest and most manageable method for storing food for the long-term is to use Mylar bags, food grade buckets, and mason jars (if kept in a dark place) in conjunction with the use of oxygen absorbers.
Here are some articles tips to help you package your food products for the long term.
Survival Basics: What the Heck are Oxygen Absorbers?
Survival Basics: Using Mylar Bags for Food Storage
Survival Basics: Buckets, Lids and Gamma Seals
How to Use a FoodSaver for Vacuum CanningYou will find that once you get started, it is pretty easy to package up bulk food items yourself and while you may not be able to avoid fluctuations in temperature, your food will still be viable for longer than those items left in their original store packaging.
The Final Word
The intent of this article is to give you a top level overview of the considerations you need to keep in mind as you begin to acquire food products for long term storage.
I know from your many emails and comments that resolving some of these food storage woes will be difficult if not impossible. Still, knowing what they are will help you be better prepared, and if nothing else, encourage you to set up an active food rotation program. And that, in my opinion, is not a bad thing.
Note:Â This article has been re-written and substantially updated from the original version that was published in February 2012.
Enjoy your next adventure through common sense and thoughtful preparation!
Gaye
6 Threats to Your Food Storage Cache
http://bit.ly/19x1jza
#preppers
Look at my new post - Homeland Funded Jade Helm Drill: Black Helicopters “Transport Dissidents to Black Sites”

The following report was originally published by Dave Hodges at his The Common Sense Show website.
Editor’s Note: Reports so far detailing the nature of Jade Helm 15 indicate that this is the largest yet in training scenarios putting the United States population in the role of the enemy. Taking place over the course of months, it stages ‘disloyal’ Southwest states and various other locales as potential sites of insurrection and conflict. It may be the biggest pre-play yet of the coming federal-state showdown, and the apparent crackdown on dissidents and other enemies of the state that would be seen under martial law.
Already, preparations for riot police to take on civil unrest have played out in the Ferguson riots and the tense atmosphere between police and protesters alleging excessive force and racial targeting. The use of a black site was uncovered in Chicago, where police conducted off-the-books interrogations and suspects were held without due process. In the background, training has taken place on American soil to detain U.S. citizens deemed “enemy combatants” and take on all-out civil unrest. These military and Homeland Security drills – and police actions – have been matched by the legal language of the NDAA and frequent political rhetoric attempting to normalize a United States of Black Bagging – a path of repression and tyranny that does not easily turn backwards.
Black Helicopters Rehearse Transporting “American Enemy Combatants†to Jade Helm 15 “Black Sitesâ€
by Dave Hodges
As I was working on a report concerning the existence of nationwide rendition centers known as black sites, I was sent a video, from multiple people, made by  Aaron Dykes and Melissa Melton filming  black helicopters, yesterday, in Texas (see video below). This video validates many reports that I am receiving about preemptive arrests of dissidents notated as “enemy combatantsâ€Â in preparation for Jade Helm 15 and this is what I believe the two reporters are witnessing.
Execution of Red List Activities to Remove Known Dissidents
Dissident extractions consist of personnel in armored vehicles descending upon a home of a known dissident. The known dissident and the family are SWAT-teamed and arrested. The dissident is transported to a waiting helicopter where they and other similarly collected dissidents are transported to where ground transportation will be used to move the captives to a “black site re-education facilityâ€.  This protocol is for the main target only. The planned fate of dissident family members is something that I have not been able to determine
Jade Helm 15 Has Already Commenced

Please note that Jade Helm 15 (JH 15)  is not commencing on July 15, 2015, as announced by the military. JH 15 is happening right now. Further, JH 15 is not only taking place in the American Southwest, there are multiple reports that JH 15 is also being conducted in North Carolina, South Carolina and Florida. In Florida, I have received reports of black sites that are in play and “dress rehearsals†are taking place as we speak. I have two reports from confidential sources that multiple black sites are in play in Tampa, FL
The dress rehearsals include, “abducting†drill volunteers as these people disappear to a black site for two days and then are released. One member of the staff at The Common Sense Show has also received a similar report, but to date, nobody has  had the courage to go on the record.
When I began to receive reports from around the country about the discovery of black sites (let’s call them what they are “Rendition centersâ€), I made official inquiries to the city government of Chicago and the Chicago Police Department regarding the funding sources of their black sites (Yes, Chicago has more than one site which includes an underground facility on the north side of the city). I suspect that these city-run black sites are receiving DHS money as a part of Program 1033 which has militarized local police departments. The funding for the Chicago black sites is a closely guarded “state secretâ€. Three days of inquiries made to Chicago city and police officials proved fruitless as they will “answer no questions on this topicâ€.
I went through a number of my sources who I thought would have inside information. One source has confirmed that extractions of known dissidents, designated as “enemy combatants†will take place before a declaration of martial law. It is clear to me that this is what we are seeing in the Dykes-Melton video. The landing of these helicopters is likely simulating prisoner transfers to waiting vehicles which will complete the transport of a known dissident to a black site. If on the other hand, if the helicopters were a part of a more standard military operation, we would see corresponding military activity on the ground. The Dykes-Melton video does not show any corresponding military activity. People in Texas and Florida should also be on the look out for simulated SWAT team raids which would be a part of this activity. This has captured the attention the media in Utah, as I am appearing on a Utah radio station on Friday afternoon to answer questions as to why I think Utah was designated to be a “hostile†state in the JH 15 literature.
Conclusion
The bigger questions remain: When will this military snap exercise, known as JH 15, actually go live? And will there be a false flag event which will serve as a precipitating event? When will real Americans begin to disappear? There is one question that can now be answered as we at least we now know why the NDAA was passed.
Dave Hodges is an award winning psychology, statistics and research professor, a college basketball coach, a mental health counselor, a political activist and writer who has published dozens of editorials and articles in several publications such as Freedom Phoenix, News With Views, and The Arizona Republic.Â
The Common Sense Show features a wide variety of important topics that range from the loss of constitutional liberties, to the subsequent implementation of a police state under world governance, to exploring the limits of human potential. The primary purpose of The Common Sense Show is to provide Americans with the tools necessary to reclaim both our individual and national sovereignty. You can follow Dave’s work at his web site, on Facebook and Twitter.
More From Dave Hodges:
When These People Go Into Hiding, It Is Time to Pay Attention
The Psychological Reasons Why American Soldiers Would Fire On American Citizens
What Does Societal Collapse and Martial Law Look Like?
The Blueprint for World War III : “This War Will Be Utterly Devastatingâ€
Homeland Funded Jade Helm Drill: Black Helicopters “Transport Dissidents to Black Sitesâ€
http://bit.ly/1bMmLSj
#preppernews
Look at my new post - Dryer Lint + Petroleum Jelly As Fire Starter- Episode 8
Dryer lint & petroleum jelly is a great fire starter.
Dryer Lint + Petroleum Jelly As Fire Starter- Episode 8
http://bit.ly/1HgXw4l
#survivalist
Look at my new article - Fat people!
I was watching the idiots on CNN, and they were talking about fat people. Enought to make your blood boil.
Fat people!
http://bit.ly/1HgXuJH
#preppernews
I just blogged at My Emergency Preparedness Blog - Example of modern godlessness in media : " Preppers "
Praise and thank Jah for the infinite blessings.
Example of modern godlessness in media : " Preppers "
http://bit.ly/1HgXdX6
#preppertalk
Look at my new article - Survival Basics: Using Oxygen Absorbers for Food Storage

When I first started getting serious about food storage, I found myself facing an entirely new vocabulary of food storage terms. It should come as no surprise that one of those terms was “Oxygen Absorberâ€. At the time, I had no clue as what they were and how to use them.
Oxygen absorbers, also known as O2 absorbers, are a mystery to many. Not a week goes by when I am not asked for guidance as to how to use them. Rather than answer those questions individually, today I am sharing an updated printer on oxygen absorbers with just enough information to get you started on the road to successfully storing bulk foods for the long term.

Learning about Long Term Storage
The very first item I purchased for my food storage pantry was a 25 pound sack of pinto beans. Of course back then, I thought I would simply store the big bag in the garage and let it sit there until I needed it. Set it and forget it. Why not?
Luckily, I did my research and learned first and foremost that beans, along with many other bulk foods, have a shelf life. Furthermore, I learned that beans will become hard as rocks if not properly packaged and stored in a cool, oxygen and moisture free environment. Who knew?
The light bulb really came on as I was reading John Hill’s book How to Live on Wheat. It was this little book that taught me not only about wheat (did you know that wheat can be living or dead?) but about storage containers, Mylar bags, desiccants
, and something called oxygen absorbers
. This set me on a serious path to learn what was in those little O2 absorber packets along with what I needed to do to use them effectively for long term food storage.
What the Heck are Oxygen Absorbers?
The first thing I learned was that oxygen absorbers are smallish little packets that hold an iron powder. Through the magic of technology, or so it seems to me, the outer wrapper lets oxygen and moisture in where it is absorbed by the iron powder. It does so while maintaining the integrity of the outer wrapper while at the same time preventing leakage of the the powder back into the packaged food.

In the process of sucking up moisture, the iron in the O2 absorber begins to rust. This creates oxidation and before you know it, in a well sealed container, 99.99% of the oxygen is used up. Any space or air left in the container is nitrogen, not oxygen, which is not a bad thing because insects can not thrive in pure nitrogen.
In simplistic terms, those little packets of iron suck up all of the oxygen from the air within the container in which it is placed.
Factoid: Air is about 21 percent oxygen, 78 percent nitrogen and 1% other gasses.
What About Storage Containers?
As you do your research, you will hear over and over again that you should use oxygen absorbers in sealed Mylar bags. This is true. O2 absorbers work extremely well when used with sealed Mylar bags. That being said, they can also be used to successfully block out oxygen with other types of packaging, too.
All of the following will work:
Metal Cans with Sealed Lids. Great if you have access to a canner or a local community kitchen. For most of us, however, this is not a realistic and cost effective solution.
Mason Jars and Canning Lids. This is one of my favorites especially since I have a special jar attachment for my food saver that will vacuum seal mason jars quickly and easily. It is just a personal thing, but I love looking at my food peeking out of those glass jars.
Mylar or Metalized Bags. These are heavy duty foil bags lined with a special plastic.
Vacuum Sealed Bags (such as the Food Saver bags). While not as heavy as the Mylar, these are much easier to handle especially if you already have the Food Saver machine itself. Note, however, that vacuum sealed bags do tend to loose their seal over time although they should be good for up to 3 years.
Plastic Buckets with Gamma Seals. These can be used alone or in combination with other Mylar or other bags such as those from the food saver.
PETE Plastic Bottles. These are great as long as they include airtight, screw on lids.
The Proper Way to Use Oxygen Absorbers
There are a few precautions you need to be aware of when using oxygen absorbers.
The most important precaution is to limit the exposure of unused packets to air. Take out only what you are going to use in the next 15 minutes or so and seal the rest up in a jar with a screw top lid. Don’t put them in a zip lock bag because they will immediately suck up the residual oxygen and become useless.
A good rule of thumb is to use one 300 cc oxygen absorber for each gallon of product. For larger containers, you can purchase larger, 2000 cc oxygen absorbers which are ideal for 5 or 6 gallon buckets.
Be mindful of the little pink pill. Most reputable vendors will include a little pink pill with their package of absorbers. If the pill is blue, the absorbers are toast so don’t use them. However, if they are just starting to turn – not quite pink and not quite blue – they are probably okay since the change of color can happen in as little as 10 or 15 minutes.
Another good test of their viability is to pick one up an hold it. It may feel warm. It will also feel soft and powdery, like a little pillow. If it gets real hot and uncomfortable, it is in full out working mode and has probably been exposed to the air for too long to be usable. In this case it may also start to feel hard and brick like. Toss it.
Oxygen absorbers themselves have a limited shelf life, even when sealed. Only purchase an amount that you will use within a year.
7 Additional Tips for Using Oxygen Absorbers
1. If you decide to do some research on your own, prepare to be confused. You will find that some sources recommend you should use a larger quantity of oxygen absorbers when packaging dried pasta and beans versus packaging grains, flours, and rice. The reason for this is that the latter are more dense so there is less oxygen to get rid of.
As I read those tables showing how many O2 absorbers to use for this or that, my head starts to hurt. You can come to your own conclusion but the overwhelming advice I received from respected vendors was that 300 cc’s per gallon or 2000 cc’s per bucket would do just fine.
2. Almost anything can be packaged using oxygen absorbers and they are so inexpensive, there is no reason not to use them. There are two things, however, that should be packaged without them. They are sugar and salt. Why? Sugar will turn to a brick of concrete and the salt simply does not need anything special to keep it preserved. It might also clump.
3. Sprouting seeds need oxygen to stay alive and to ultimately germinate. This means that you will be defeating your purpose if you seal them up with an oxygen absorber. Don’t.
4. A bag sealed with product plus an oxygen absorber may or may not turn brick like in a day or two or even up to a week. The ability to fully compress is dependent upon factors such as head room and the amount of air that was sucked out during the sealing process.
This is not a problem in spite of what you may read on the internet. If you have used an oxygen absorber sufficient for the size of your packaging, the oxygen will be gone. The extra air is simply nitrogen and it will not harm your food. Of course, if it makes you feel better, you could open the package and start all over again but that is not really necessary for anything but your peace of mind.
5. When using a mason jar to seal bulk foods for the short term (one or two years), there is no need to use an oxygen absorber since your food will remain fresh for a few years on its own. On the other hand, the O2 absorber is low in cost (ten cents give or take) and provides an extra layer of protection.
6. Do not confuse oxygen absorbers with desiccants. The oxygen absorber removes oxygen and the desiccant removes moisture. You can use both although some foods are inherently dry to begin with and once vacuum sealed, will stay that way making their use superfluous especially if stored in a dry area.
7. During your food storage session, get everything set up in advance, assembly-line style. By that, I mean set up your packaging material (most likely Mylar bags or mason jars), fill them with product, and then, at the last minute, take out the number of O2 absorbers you need. Before moving down the assembly line, immediately seal the extra, unused O2 absorbers in a lidded mason jar or vacuum seal bag. This will ensure that they will still be viable for the next food packaging session.
Additional Resources
There are many articles on Backdoor Survival that can help you manage your food storage. Here are a few to get you started:
Survival Basics: The Six Enemies of Food Storage
Survival Basics: Buckets, Lids and Gamma Seals
Survival Basics: Using Mylar Bags for Food Storage
16 Food Storage Tips for the Space Challenged Prepper
14 Common Food Storage Mistakes and Goofs
For a more detailed and comprehensive handbook on food storage, be sure to check out my book, The Prepper’s Guide to Food Storage, that can be purchased on Amazon. The e-book is only 99 cents and the print version is $5.99.

The Final Word
There is no reason that oxygen absorbers should be a big mystery. The reality is that they are a cinch to use and inexpensive to boot.
Using them will pretty much guarantee that your bulk foods will stay fresh over the long term and as you know, you simply can not beat the cost-effectiveness of bulk foods. Wal-Mart, Costco, and LDS Home Storage Centers sell bulk foods at reasonable prices and with a little bit of work on your part, can provide you and your family plenty to eat when grocery store shelves are bare.
For an interesting technical discussion of Oxygen Absorbers, read A Guide to Oxygen Absorbers.
Note: This article has been re-written and updated from the original version that was published in August 2011.
Until next time, keep on prepping!
Enjoy your next adventure through common sense and thoughtful preparation!
Gaye
If you enjoyed this article, consider voting for Backdoor Survival daily at Top Prepper Websites! In addition, SUBSCRIBE to email updates and receive a free, downloadable copy of my e-book The Emergency Food Buyer’s Guide.

Bargain Bin: Here are some of my favorite food storage items. Whether you are just getting started or a seasoned pro, here are the items you will need when purchasing food in bulk for long term, storage needs.
Mylar bags & Oxygen Absorbers: What I love about Mylar bags and oxygen absorbers is they protect against every single one of the food storage enemies. Prices do vary but for the most part, they are inexpensive and easy to keep on hand. And while you can seal them up with a FoodSaver, some tubing and a common clothes iron, I find it infinitely easier with a cheap hair straightening iron that you can pick up $20 or less.
60 – 300cc Oxygen Absorbers: This is one area where you want to make sure you are getting a quality product. Currently, a pack of 60 (in three 20 unit packs) is about $10 with free shipping.
Ball Regular & Wide Mouth Jar Storage Caps: I must have 30 or 40 of these. I love to use mason jars for panty storage and for those items I go through quickly, I see no need to use the vacuum seal gizmo that goes with my FoodSaver.
FoodSaver Vacuum Sealer: As long as the unit has an accessory port (and this one does), an in expensive FoodSaver will work just as well as the fancier models. That is my two cents, at least.
FoodSaver Wide Mouth Jar Sealer: Already have a FoodSaver? If so, check out this jar sealer which can be used to vacuum seal your Mason jars. This is a great option for short to mid term storage of items such as beans, rice, sugar and salt. Store your jars in a cool, dark place and you are set with the added advantage of removing a small amount for current use without having to disrupt your large Mylar bag or bucket of food. There is also a version for regular sized jars. See Fast Track Tip #4: How to Use a FoodSaver for Vacuum Canning.
Sharpie Permanent Markers: Sharpies were invented for preppers! And without question, Amazon is the cheapest place to buy them. Typically, the price on Amazon is less that $7 for a dozen.
Conair Ceramic Instant Heat 2″ Straightener: An inexpensive hair iron such as this one is perfect for sealing Mylar bags. It can also be used on your hair so it can serve a dual purpose. For an even cheaper alternative, consider this one that works equally well but has smaller blades.
Nesco 600-Watt Food Dehydrator: This modestly priced dehydrator (less than $60) has over 1000 reviews and comes up as the most highly rated dehydrator on Amazon. I wish I had started out and learned the ropes with this unit rather than the more expensive Excalibur which did not work out for me.
How to Live on Wheat: I always wondered why wheat was recommended for food storage. This well-written book will teach you everything you need to know about wheat. Recipes included!
Prepper’s Guide to Food Storage: This modestly priced book is about food: What to store, how to store it and best practices. It is a roadmap for showing ordinary citizens that long-term food storage is not something that will overwhelm or burden the family budget. A lot of material from Backdoor Survival is here; conveniently located in one place. I wrote this book and am proud of it.
~~~~~~~~~~~~~~~~~~~~~~~~~~~~
Shop the Emergency Essentials Monthly Specials: The monthly specials at Emergency Essentials feature discounts of up to 35% off sometimes a bit more.
A good value is the Do It Yourself SuperPail Combo which includes 8 x 6-Gallon Buckets with Lids, 8 x Metallized Storage Bags and a 10-Pack of Large Oxygen Absorbers.

Don’t forget that you do not need fancy equipment to seal the metalized bag. A cheap hair iron will do the job. Forget about a hose and a vacuum sealer. A $20 hair iron works great – just be sure to get one with 2†plates.
~~~~~~~~~~~~~~~~~~~~~~~~~~~~
Need something from Amazon (and who doesn’t)? I earn a small commission from purchases made when you begin your Amazon shopping experience here. You still get great Amazon service and the price is the same, no matter what.
Amazon has a feature called Shop Amazon – Most Wished For Items. This is an easy tool for finding products that people are ‘wishing†for and in this way you know what the top products are. All you need to do is select the category from the left hand side of the screen.
The Amazon Top Most Wished For and Best Selling Outdoor Items
Emergency Preparedness Items from Amazon.com
Shop Amazon Tactical – Great Selection of Optics, Knives, Cases, Equipment
Amazon Gift Cards
Help support Backdoor Survival. Purchases earn a small commission and for that I thank you!
~~~~~~~~~~~~~~~~~~~~~~~~~~~~~~~~
Survival Basics: Using Oxygen Absorbers for Food Storage by Gaye Levy first appeared on Backdoor Survival.
Survival Basics: Using Oxygen Absorbers for Food Storage
http://bit.ly/1HgX3iu
#preppernews
Monday 30 March 2015
Look at my new blogpost - HOW TO COOL A RED BULL IN YOUR CAR, URBAN SURVIVAL
how to cool any type of canned drink in a car using the ac vent.
HOW TO COOL A RED BULL IN YOUR CAR, URBAN SURVIVAL
http://bit.ly/1MrQVuu
#preppers
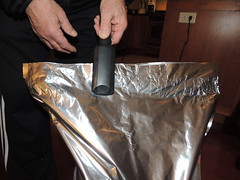
I just blogged at My Emergency Preparedness Blog - Awesome Food Storage Set Up! Dude!
This is my friends garage. He basically turned his entire garage into a grocery store.
Awesome Food Storage Set Up! Dude!
http://bit.ly/1MrQr7A
#preppertalk
New blogpost (*NEW* Thrunite Ti Titanium: 162 lumen 1xAAA Keychain Light) has been published on My Emergency Preparedness Blog
http://www.thrunite.com/ Thrunite Ti in Amazon: http://www.amazon.com/gp/product/B00QQBOW0G?ie=UTF8&camp=1789&creativeASIN=B00QQBOW0G&linkCode=xm2&tag=surviinargen-20 Thrunite …
*NEW* Thrunite Ti Titanium: 162 lumen 1xAAA Keychain Light
http://bit.ly/1MrQccQ
#preppers
I just blogged at My Emergency Preparedness Blog - Top 10 EDC Items
This list of top ten EDC items includes what I believe to be some of the most important “must haves”. Of course your personal choice may vary depending on your own circumstances, location and…
Top 10 EDC Items
http://bit.ly/1CFfXzV
#preppertalk
Look at my new post - Food Storage Continues
I have added to my food storage again, I met my goals earlier storing some peanut butter and honey. Some additional cans and pancake mix as well. My next goa…
Food Storage Continues
http://bit.ly/1CFfLAx
#survivalist
New blogpost (Solar Eclipse 20-03-2015 Doncaster) has been published on My Emergency Preparedness Blog
Photo’s taken by the boys using a Canon 12mp camera with a Baader film filter / No filter when cloudy / Green welding glass . They had the morning off school as their school was not going out…
Solar Eclipse 20-03-2015 Doncaster
http://bit.ly/1CFfdLc
#preppertalk
New post (Szkolenie Preppers - LIny, Węzły i różne triki) has been published on My Emergency Preparedness Blog
Improwizowane techniki ewakuacji. Improwizowane metody dostępu linowego. Najbardziej przydatne węzły dla Preppers.a Triki oraz patenty z linami, taśmami oraz paskami. Zapraszamy na szkolenie.
Szkolenie Preppers - LIny, Węzły i różne triki
http://bit.ly/1CFf1vp
#preppers
Look at my new blogpost - 4 Survival Prepping Tips EVERY Prepper Should Know!
Get Your Free Prepping Crash Course… http://guidetoprepping.com/crash Often people don’t like to think about disaster but if you want to be safe AND survive a disaster than it’s absolutely…
4 Survival Prepping Tips EVERY Prepper Should Know!
http://bit.ly/1CFeGsB
#survivalist
Look at my new article - Five How-To-Do-It Articles For Defending Your Home And Retreat Against Looters, and Jackbooted Thugs
1. A Green Beret’s Guide To Low-Budget Home-Defense Techniques 101: “Early-Warning Systems and Fortifications†: “This article is the first in a series that covers hardening your home and some easy, low-budget alternatives for early-warning systems and fortifications. For all the prior service members (especially 11-Bravos), parts of this will be basic: this info is especially for those who haven’t been in the military to introduce them to some fundamentals. Please bear with me and do not feel insulted.”
2. M.D. Creekmore’s Defensive Strategies for Home and Retreat…
Five How-To-Do-It Articles For Defending Your Home And Retreat Against Looters, and Jackbooted Thugs
http://bit.ly/1xujrF5
#preppernews
New blogpost (How to Set a Broken Bone or Treat a Dislocated Joint) has been published on My Emergency Preparedness Blog

The X-ray owner, Tim Snell, says this injury didn’t hurt as much as you’d think. “I can’t claim that the process of ‘popping it back in’ didn’t hurt though,” he wrote on Flickr, where he shared the X-ray. “What i thought would be a 5 second ‘click’ ended up taking 3 professionals over 10 minutes of tugging, twisting and pulling to get the little bugger back in place. it’s a good job i was pumped full of laughing gas.” (“Snap My Fingers,” shared via CC BY-ND 2.0.)
Broken bones and dislocated joints are pretty common injuries, and I have several posts on how to treat them in an emergency. But many people have asked specifically how to “set†a bone, meaning, I presume, how to straighten a broken arm, leg, finger, or toe if it is crooked.
The answer is most of the time, you should do nothing for a crooked bone or displaced joint other than splint it as-is until you can get to a doctor. Trying to move it around is likely to cause more damage.
But there are some injuries when, indeed, you may want to take that chance and try to set (straighten) the bone or put the joint back into place. And, of course, there’s always a chance you’re in a situation where expert help is many days away.
In those cases, the key to treatment is to apply traction—properly.
How to Apply Traction Properly
Basically medical traction involves pulling on a bone. So, you grab the end and pull. Easy? Well …
- First, make sure you have a good grip because you’re going to have to pull hard and usually for several seconds, even minutes. A glove or cloth can help.
- Next, know that you must pull in the same directional plane as the bone. In other words, make sure you’re not angling it and putting pressure or torque on the fractured area. Otherwise you could damage the area a lot more.
- Remember not to jerk. Begin with a slow pull, and gradually pull harder and harder and, sometimes, harder.
>> Special traction for shoulder dislocations: Click here for how to put a shoulder back into place.
What Traction Does
With a break or dislocation, the muscles perceive the injury and contract, I guess to try to protect the bone. But this contraction and pull can also make the bone more crooked, and it will always make it harder to put the bone back into place.
With traction, we’re attempting to stretch those muscles so they give enough slack that the bone can be straightened, or so the ends of dislocated bones have enough space between them to pop back into place.
The best way to get the stretch is to start slow and kind of sneak up on the muscle, in essence letting it know you’re not there to hurt it. Then, gradually pull harder. In the end, you may have to pull really hard, but never jerk—which will only scare the muscle into contracting more.
Step 2: Splint
If there’s a fracture, have someone splint the bone in place before you let go of the traction, to lessen the chance of the bone moving.
With a dislocated joint, you can let go after it’s back in place and then splint it. In this case, the splint isn’t to keep the bones in place as much as to protect the joint. A dislocated joint is usually caused by a sudden jerk or hit that stretches or tears ligaments and tendons, which allows the bone to pop out of place. Then, very quickly, the muscles are back contracting, and the out-of-place bone is stuck but would dearly love to get back to its normal position. If you can stretch out those muscles so the end of the one bone is beyond the end of the other, it will usually gladly pop back into place and stay there. A splint allows protection and immobilization for the tendons and ligaments to heal.
When Not Do It Yourself
Any time you manipulate or move an injured part of your body you risk further injury. An experienced health care provider is less likely to cause injury and also to know when and how much straightening needs to be done. In addition, a little (or lot) of anesthesia can go a long way in allowing the muscles to relax and making it easier to put the bone back into place (not to mention alleviating the pain). So, in the great majority of the time, it’s best to splint the injury as-is and wait on an expert.
When to Consider Trying Traction
Consider trying traction for any of the following reasons:
- To take pressure off a nerve. If the fingers or toes distal to (on the far end of) the break or dislocation are numb, there could be pressure on the nerve. In general this could wait for maybe even a day to be relieved before there’s irreversible nerve damage.
- To take pressure off an artery. If fingers or toes distal to the break are blue or if you can’t find a pulse, taking the pressure off the artery within a few hours could save further major damage to the area not getting the blood.
- To stop bleeding. A big, major artery lies next to femur (thighbone) and can be damaged with a break to the bone. In some cases, bleeding can be life threatening. Quite a bit of blood loss may occur even before the thigh starts swelling. Because the artery is so deep, applying direct pressure or even a tourniquet may not be enough. Applying traction may not only straighten the bone but allow the big muscles around the artery to better compress the area and decrease or stop the bleeding. This will need to be continued by then applying a traction splint. But that’s for another post.
- Because help isn’t coming. If expert help is many days away, not getting a bone back in proper position could permanently limit the function of that bone. For instance, you’re never going to be able to move a dislocated joint. A crooked bone may be more of a judgment call. In general, if it’s not exactly straight that may be more of a long-term cosmetic issue than how it might function.
Sometimes, the only way to get perfect alignment is with surgical pins and plates—something you’d never try on your own.
Have you ever had a crooked broken bone (displaced fracture) or dislocated joint? What did you do?
How to Set a Broken Bone or Treat a Dislocated Joint
http://bit.ly/1EVZKmQ
#preppers
Subscribe to:
Posts (Atom)